tomakeandtobe
  • Home
  • about
  • workshops
  • Blog
  • contact

Wood burning sauna in Atlanta

1/3/2014

11 Comments

 
Picture

This sauna and blog post are dedicated to my friend, John Brown.

For many years now I have been interested in wood burning saunas.
I had experienced a Native American sweat lodge years ago and afterwards I often built them myself while on wilderness trips.
When I came to work at the Carpenter's Boat Shop in 2003 I met a man named John Brown who built a sauna that I very much enjoyed using. (this is a different John Brown than my Welsch chair-making teacher)
 
My brother Karl recently asked me if I would be willing to build a sauna in his back yard in Atlanta, so it was a great opportunity to use some of the things I have learned from John about sauna design.
Many of the construction details of Karl's sauna are inspired by John's designs, I am very grateful for his generosity and continuing enthusiasm for saunas.

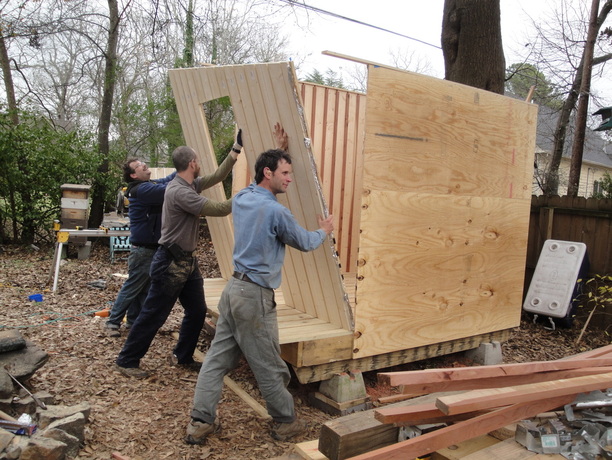
I had the invaluable help of my brothers Keith and Karl for the building of the sauna.
We had just a week to build this and because we were on a tight budget, I decided to use building techniques that were fast and inexpensive.
Although I prefer using hand tools, Karl had power tools which greatly sped up the building process, especially pneumatic brad nail guns and a round-over bit in an electric router.
  
Picture


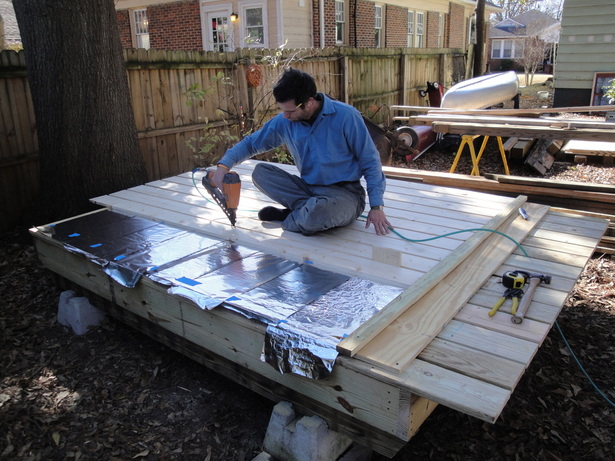
We started with salvaged 7/8" decking, laid onto a 2x6 frame with 1/2" gaps between the deck boards.
Having gaps in the floor allows rinse water to drain out and guarantees plenty of air movement.
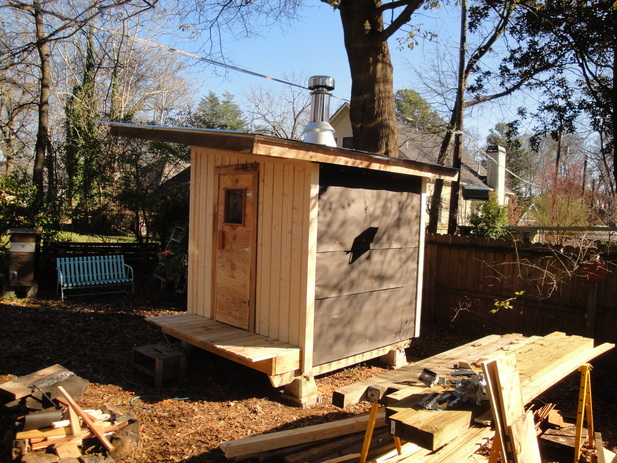
Thanks to Georgia's mild winters, we were able to set the frame on four floating concrete foundation blocks, instead of digging a deep foundation.
Then we cut 3/4" plywood to the correct size for the walls.
We worked on one wall at a time and used the deck as a platform to build upon.

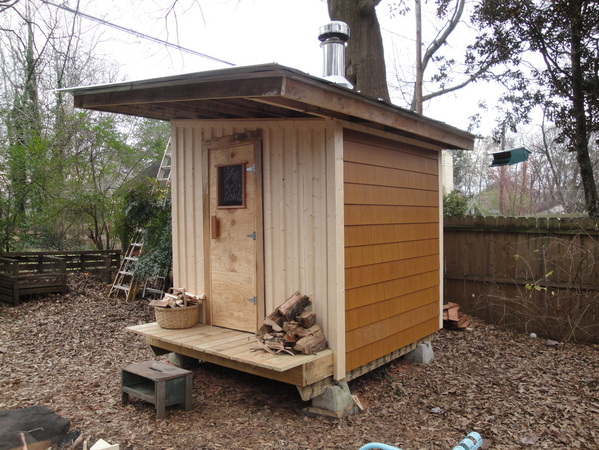
Because conventional vapor barriers would be so negatively affected by the heat in a sauna, John Brown's design incorporates aluminum foil instead.
We rolled the foil out onto the plywood wall, taped it down, then laid out 3/4" x 5" pine boards with 1/2" spaces between, then nailed it all together.
We turned the wall over and, going from the plywood side through to the pine boards, we screwed it all together for strength.
The plywood was left long on the bottom to cover the 2x6 sill.

Picture

Picture

Picture


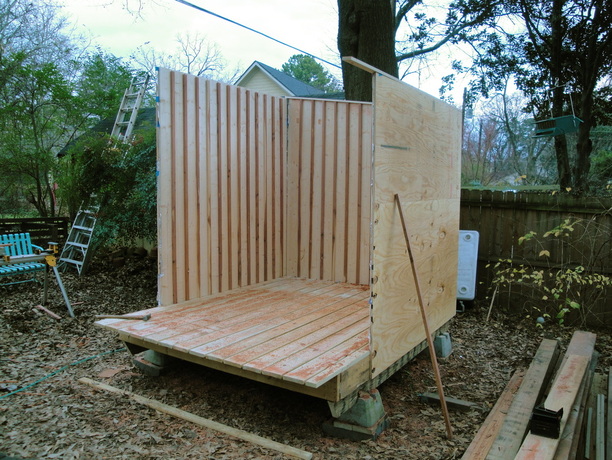
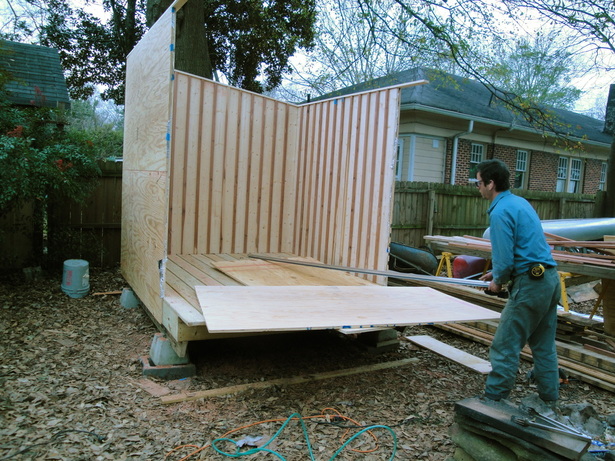
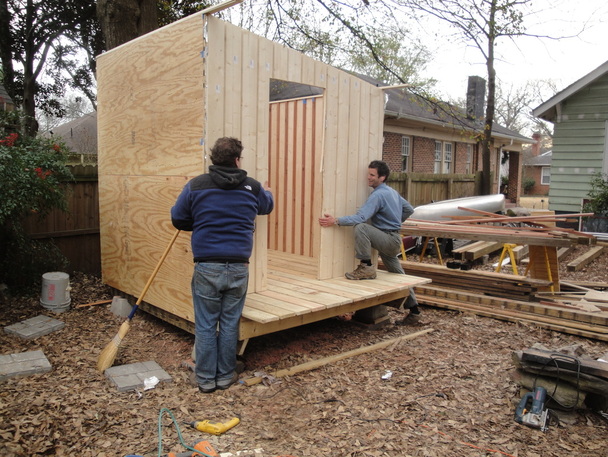
We weren't using a studded frame construction, so we offset the corners to allow the plywood/board walls enough material to interlock and screw together on the corners.

The rough opening for the door was cut out.
The waste piece later became the core for the finished door, which was hung two inches out of plumb to allow it to close on its own.
We used a tempered glass shelf from an old refrigerator for the window.
Tempered glass is more durable and will resist impacts and temperature changes better than regular glass.

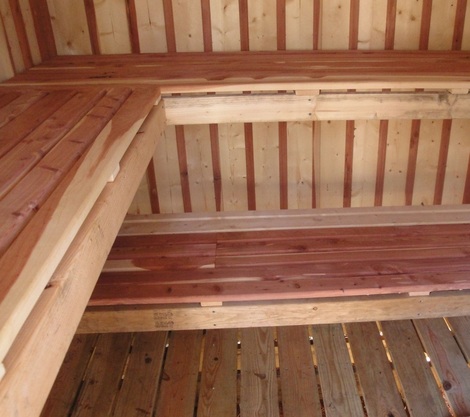
Once all four walls were raised and had the corners and bottoms connected, we attached the interior red cedar battens.
These were sized and arranged to cover the gaps between the pine boards, they also help to stiffen the walls.
The Georgia-grown red cedar we used is especially aromatic.
We only used cedar for the battens and the bench tops, these are the only areas where a body will come into contact with the structure when using the sauna.

Picture

Picture

Picture


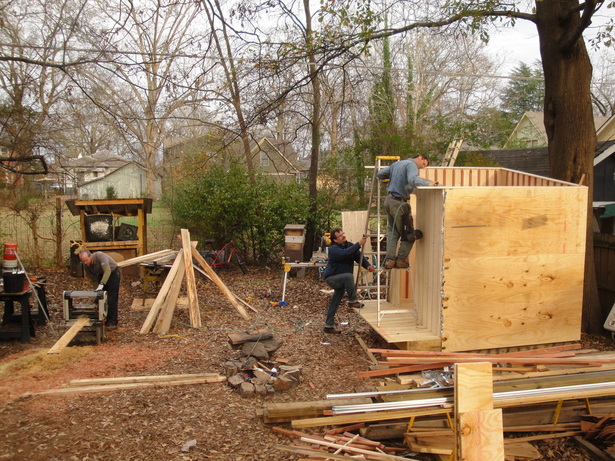
To connect the walls to the roof, I fastened a 3/4" x 3" plate on the upper edges of the plywood walls.
Onto this we laid and attached 2x6 rafters, with 3/8" plywood as a sub roof.
We finished with a galvanized metal roof. 

Picture

Picture


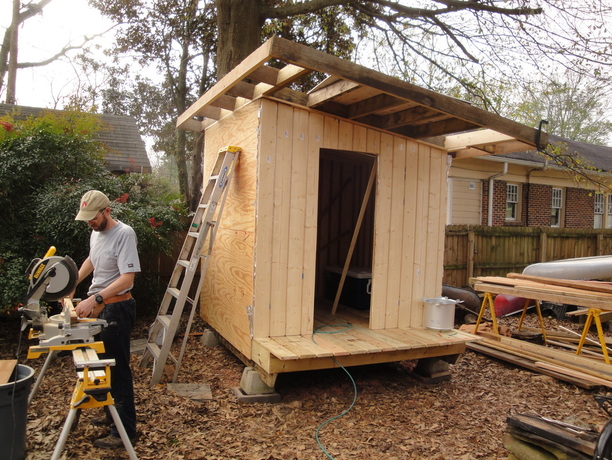
We installed an insulated through-the-roof stove pipe kit.
The bench framing was done with 2x4s, their tops were made of the 7/8" red cedar ripped into 3" wide boards with 1/2" gaps between.
Benches are removable for occasional scrubbing and cleaning.

Because of nudity issues in the city, rather than an outside shower, we ran a garden hose up through the floor.
This provides plenty of water for making steam, cooling down and washing off.

I was able to take two excellent sauna baths before I returned to Maine.
Karl's new sauna worked extremely well; it breathes nicely, it smells great and because of the low, sloped ceiling, the steam rolls beautifully down your back.
 

A sauna in a week:
1st day - foundation
2nd day - begin walls
3rd day - continue walls
4th day - interior walls and roof framing
5th day - roof
6th day - bench framing, tar paper
7th day - fitting stove pipe and benches, siding


Picture

11 Comments
Mike Iacona
6/30/2014 03:10:37 am

Hi Kenneth, I really like the simplicity of this design. Thanks for explaining your assembly process so eloquently and succinctly, too. I'm really feeling like a sauna-build is in my near future!

A couple questions I have - did you insulate the roof? Is there foil in the roof? What is the interior surface of the ceiling?

Thanks for any help,

Mike

Reply
Kenneth Kortemeier link
7/1/2014 08:43:02 am

Hello Michael, Thanks for your interest in the sauna. At the owner's request I did not insulate the roof. I think (and the owner agrees) that it would have been better to have insulated the roof. He says the sauna cools off too quickly without any insulation. I think some sort of water proof insulation would work well. Foil would be a good choice perhaps Roxul (that is water resistant) would also work well. What ever you use I think a vapor barrier is important because of all the moisture in the sauna. The interior surface of the sauna is the same as the walls. Pine boards with cedar battens over the seams between boards. The battens and boards are nailed or screwed into the roof rafters. Hope this is helpful.

Reply
Jeroen
9/9/2016 01:29:27 pm

Hi Kenneth,
I also like the design and simplicity of the sauna. I have the opportunity to build a sauna in my back yard, since we are moving to a house in a forrest area.
When I saw this site, my first thought was that i want to build a sauna like this.

As the explanation is very extensive, I have quite a few questions. Can you give the dimensions of the overall building? Floor, wall and roof?

Did I understand it correctly that you only used alufoil as a insulation between the exterior and interior?

Why did you finished the walls with tar paper?

What do you advise for the roof insulation foil or better rockwool?

Thanks for having my questions answered.

Jeroen.

Reply
Kenneth Kortemeier link
9/19/2016 02:14:33 pm

Hello Jeroen,
The sauna is based upon the size of standard US plywood sheet goods (8 feet by 4 feet). It is 8 feet by 12 feet long and wide. The height is 8 feet along the highest wall. Build your interior benches so that your head is very close to the ceiling when sitting on the upper most bench. One could include a small changing room and then the sauna would be 8 feet by 8 feet with a 4 foot by 8 foot vestibule.
There is no insulation except in the roof cavity. I used aluminum foil in the walls only as a vapor barrier, even this may not be needed as there is actually little moisture permeating the walls. The ceiling may need a vapor barrier depending upon the type of insulation used and how water will effect it. I like rockwool in the ceiling because it is impervious to water, also the heavy plastic/foil roll insulation is very good but more expensive.
I like how tar paper allows moisture to pass through it better than modern house wraps do. With good overhangs, one could get away without any exterior wrap under the siding. This type of design needs good ventilation so be sure to leave gaps in the floor decking of 3/8”-1/2”.
I hope this is helpful, Kenneth

Reply
Jeroen
3/28/2017 01:24:22 pm

Thanks for answering.
What kind of stove do you use? A bought one or did you make one your self? Do you have a picture of the interior of the current situation?

Karl Kortemeier
3/31/2017 01:02:05 pm

Jeroen,

The stove is made by Four dog Stove Co. Its actually a camping stove, but it works wonderfully for the sauna. I talked to the owner and he says he uses one for his sauna also. I pour water directly on the stove and it works fine. Keep in mind, the original saunas used an open fire, so use what you have!

Alison
9/19/2016 11:14:56 am

Hi there,

We constructed a similar sauna in Alberta Canada, but because of our very cold winters, we put a lot of attention into insulating in order minimize our heat loss (important in -30). I am however, having a hard time figuring out the appropriate clearance and heat shielding for the wood stove. I am looking for economical ways to ensure the clearance is minimum but sufficient and safe(as the space itself is only 6x6). Thanks for your suggestions.

Reply
Kenneth Kortemeier
9/24/2016 12:35:35 pm

Hello Alison, As far as heat shielding in the sauna it is an important issue. I have used cement board with an air space behind it with much success. Another way is to use sheet metal with an air space. I have found that with these adaptations, one can position the stove within 8-10 inches of the heat shield. Using a 2" long section of 3/4" pipe with the mounting fastener running through it works well as a spacer behind the heat shield. Then keep an eye on it as you use it and don't over fire the stove.

Reply
Bill M
11/27/2016 04:59:31 pm

I love the design and the overhang porch. I have an electric sauna in my basement and take a couple saunas per week. I am planning on building a wood fired one, outside next summer. Being Michigan, I intend to insulate the walls and ceiling well. You mention the need for lots of ventilation, why? I am worried about bugs coming in through the floor gaps. I am thinking of a floor drain, that will go into a French drain under the floor boards. Whats your thoughts on this? thanks

Reply
kenneth Kortemeier link
11/28/2016 02:25:32 pm

Hello Bill, It sounds as if you are ready for a wood fired sauna, I am not surprised as I think the heat from wood produces a sauna experience that I appreciate much more than electric heat.
I have a sauna in Maine that has no insullation in the walls and about 6" of rock wool in the ceiling. I do have 3/8" gaps in the deck for ventilation and to let the water being poured on people drain out. I think you can also do a fench drain as you mentioned, but letting it pour out the bottom is simpler. I have not had a problem with insects in the sauna here in Maine, I think the heat from the sauna(190 degrees) and the steam work to drive them out. If you go with a french drain you will need to provide an inlet for air(near the stove base to feed the stove) and and exit for air (near the top of the benches behind the bathers to let the steam out). Perhaps you could put screens over these openings if needed for bugs. These openings will allow the steam and air within the sauna to flow, without them you may find it is too steamy and difficult to breathe when water is poured on the stove. The flow also helps to dry out the sauna when your done and helps keep it cleaner feeling inside with less chance of mold. Hope that is helpful! happy sauna-ing.

Reply
Tish
1/16/2017 05:55:46 am

I am starting construction of my wood burning Sauna. Love how you designed the benches. My sauna will be 8 X 10 with the same sloping roof line. But now I am stumped on how I can let the water drain out. I am in Montana and we get cold averaging around -10 to 20 degrees. So the water will freeze up. Any suggestions? A french drain won't work right now the ground is frozen. I may have to hold off on my plans if I can't figure this out.

Reply


Leave a Reply.

    Author

    Kenneth Kortemeier,
    enjoying the process of making.

    Archives

    December 2016
    November 2016
    March 2016
    June 2015
    May 2015
    March 2015
    June 2014
    April 2014
    February 2014
    January 2014
    December 2013
    November 2013
    October 2013
    September 2013
    August 2013

    Categories

    All

    Picture

    RSS Feed

Powered by Create your own unique website with customizable templates.